Building a sound wall: Where do I begin?

We see sound walls going up all over the world, and while that excites us here at Tools4Reading, we want to ensure you understand the process of setting these up. More importantly, we hope to equip you with the knowledge you need about phonology and orthography to implement sound walls in a way that aligns with the science of reading. We will release a series of blogs intended to support you as you begin this journey and to hopefully answer any questions you might have along the way. First order of business: How do I build a sound wall?
Step 1: Identify a space in your classroom for the sound wall.
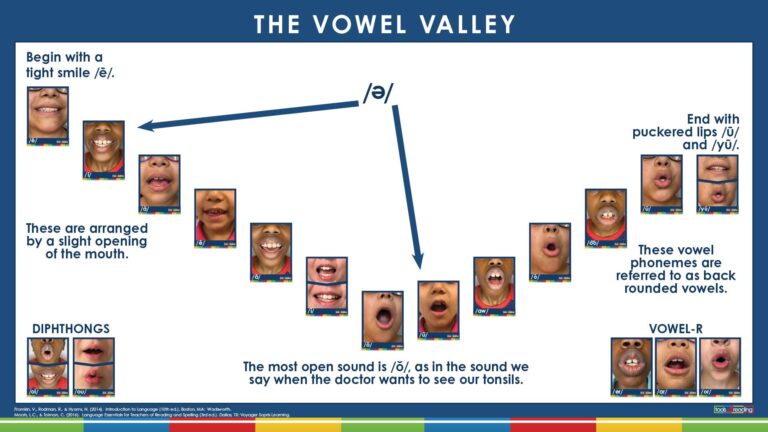
You will need space to post both a consonant and vowel sound wall. They do not have to be side by side, but you will want both to be visible to your students so that they can interact with sound walls throughout the day. Ask yourself:
- Is this location easily accessible for both my students and me?
- If placed out of reach, do I have a flashlight or laser pointer to point out sounds?

Step 2: Gather the materials needed to build sound walls.
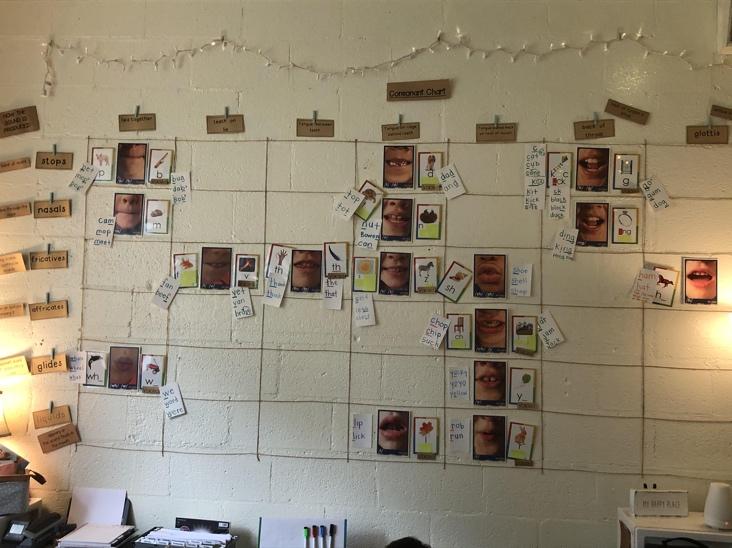
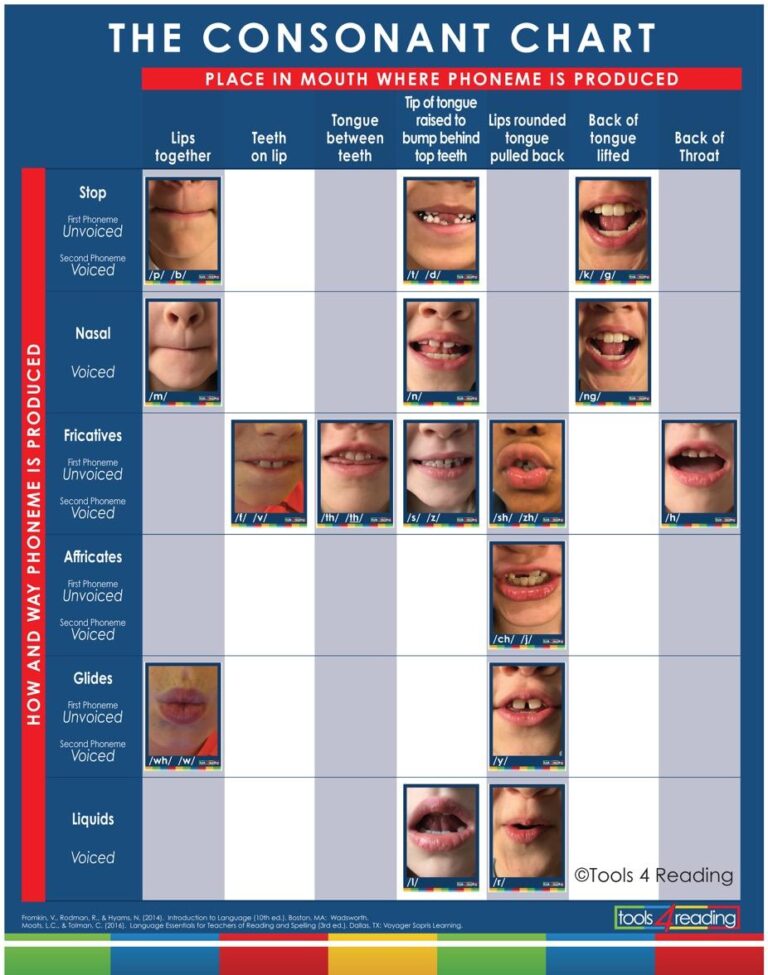
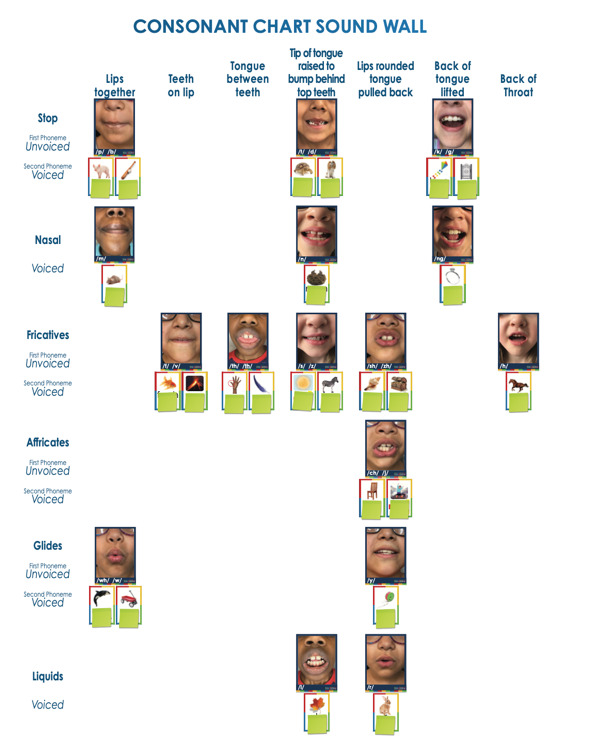
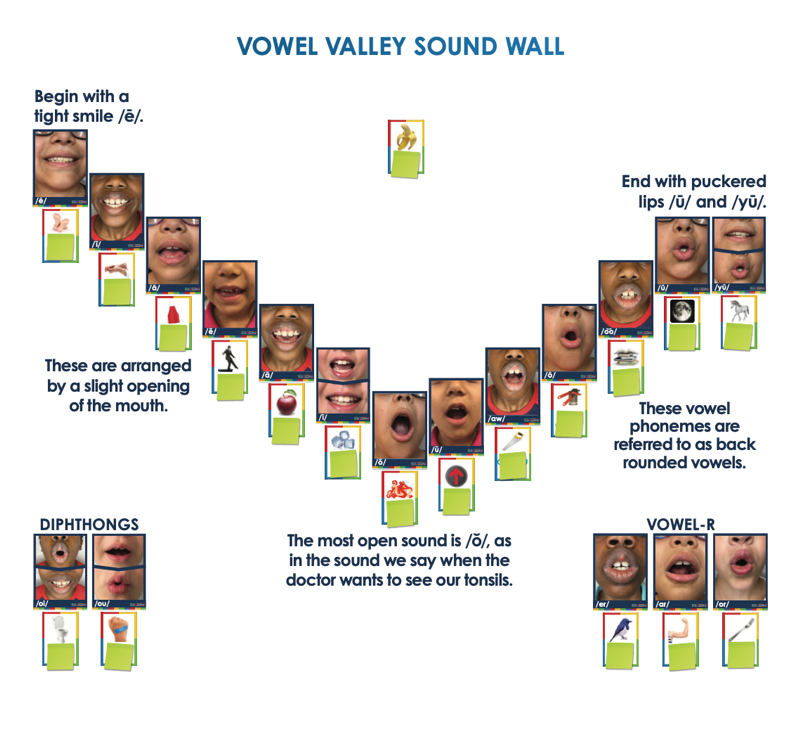
Sound walls are unique because of the way they illustrate the connection between speech and print. We use Kid Lips™ pictures to emphasize articulatory gestures. These mouth movements become the talking piece that helps anchor each phoneme into memory. Everything on your sound wall is structured and organized around these articulatory gestures. Phoneme-Grapheme Mini Cards™ are posted next to the Kid Lips pictures and include a keyword image to show how the phonemes (mouth movements) relate to graphemes (the letters in print). Check your sound wall for the following:
- Do I have Kid Lips™ cards?
- Do I have Phoneme-Grapheme Mini Cards™?
- Do I have labels for place and manner of articulation?
Step 3: Post labels for place and manner of articulation.
Organizing phonemes by place and manner of articulation not only provides you with a structure for easy reference but also gives you and your students insight into how phonemes can be similar and different. Our goal here is to teach students to differentiate between phonemes and attach the correct grapheme to the correct phoneme as they read and spell words. We see many teachers posting sound walls according to consonant phoneme type (i.e., they break up the types of consonant phonemes to save space). We encourage you to use the same structure and organization provided in the Kid Lips Instructional Guide™ to preserve the linguistic insight about how phonemes are perceived and produced. See example below:
Step 4: Devise a plan for revealing new sounds and graphemes.
You will want to build the sound wall with your students. By explicitly teaching each phoneme and discussing where it belongs on the sound wall, you and your students begin to familiarize yourselves with the structure and organization of the sound wall. This will enable you to reference the sound wall both as a scaffold and as a tool throughout the school year as your students learn to read and spell. Some teachers choose to wait and post the Kid Lips™ cards when they teach that phoneme; others hang them on the wall turned around or with a cover over them until it’s time to reveal a certain skill. Either way is fine! You just want to be sure to plan your implementation ahead of time.
Ask yourself:
- Will I place all cards on the wall prior to teaching the sounds?
- Will I turn untaught sounds/graphemes over until explicitly taught?
Step 5: Establish a time during the instructional day for sound walls.
You may choose to initially teach the phonemes (speech sounds and mouth movements) before a phonics lesson or anytime throughout the day. Remember, most of your students are familiar with these speech sounds: they use them every day when speaking and listening. Our goal as teachers is to bring their attention to features of the individual phonemes as they begin to connect speech to print. You will want to follow the Kid Lips™ Instructional Guide to provide direct, explicit, and systematic instruction as you explore each phoneme. Because students are familiar with most phonemes, you need not try to marry the building of Kid Lips™ pictures on your sound wall with your phonics scope and sequence. However, you WILL want to align how you reveal the graphemes on the Phoneme/Grapheme Mini Cards with your phonics program.
Consider the following:
- Have I thought about when to introduce new sounds?
- How will I introduce those sounds with the sound wall?
- Have I established a plan for reviewing the sounds on the sound wall? Will this be sporadically during the day? A set time during my ELA block? Part of my morning routine?
Sound walls can be a powerful resource for you and your students as you teach them to read and spell. Beginning the year with the right materials and a solid plan is key. Let us know how your students are responding as you build your sound wall during these first few weeks of school.
In the next post in the series, we will discuss sound wall implementation and how sound wall conversations evolve throughout the school year.