Implementing sound walls: It’s as easy as 1-2-3!

The secret sauce of sound walls is not in what you post on your wall but in how you implement those materials in your daily routines and instructional practices. Sound wall conversations begin like any other skill should when it’s first introduced: with direct, explicit, and systematic instruction.
After explicitly introducing all 44 phonemes, your sound wall conversations will evolve as you take a more diagnostic and prescriptive approach. You will pay close attention to phonemes your students confuse in their speech and writing samples. Based on those confusions, you will design sound wall conversations to address the articulatory gestures of each phoneme your students confuse to help them develop phoneme sensitivity so they can begin to differentiate speech sounds.
Sound walls can also help enhance how you introduce the skills you teach in phonics. By focusing on phonemes first, you’ll warm their ears up for what their eyes will see when you make the connection between phonemes and graphemes clear during your phonics lessons.
Successful implementation begins with the end in mind. We want to design our instructional minutes to include daily practice with analyzing speech sounds and making connections between speech and print. Below we provide you with suggestions for how you can intentionally utilize your sound walls throughout the school year in your daily routines.
Beginning of the year
Follow the scope and sequence in the Kid Lips™ Instructional Guide when introducing each phoneme. This can happen on Day 1 of school and can be a part of getting to know each other. You might use the first sound in students’ names to highlight as you explicitly introduce, model, and practice each phoneme (the pacing of this scope and sequence is suggested for kindergarten. Plan to go as quickly as you can but as slowly as you must).
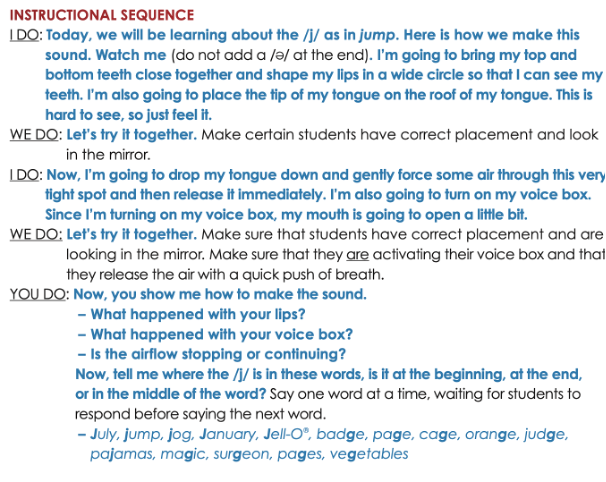
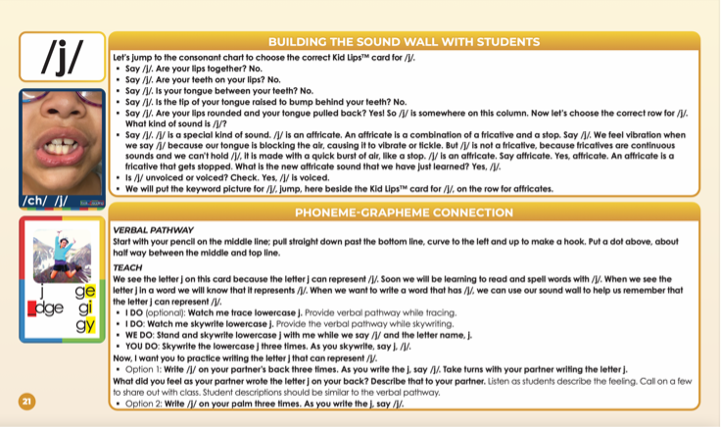
- Turn to the page that includes everything you need to know about the phoneme(s) you are teaching and introduce the sound using the script in blue.
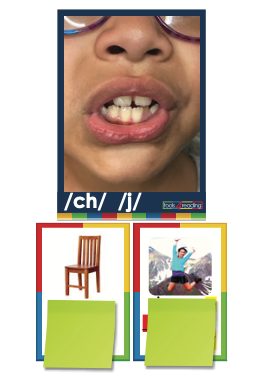
- Place the Kid Lips™ Picture Card on your sound wall, pointing out the place and manner of articulation. Keyword picture cards can be posted but cover graphemes that have not been taught/mastered.
- Review previously taught sounds and place/manner of articulation each day so that students begin to understand the structure and organization of the sound wall (This will come in handy as they begin to utilize the sound wall as a tool to reference as they spell words).
After introducing ALL phonemes
Once all Kid Lips™ Picture Cards are posted/revealed on your sound wall, you can design sound wall conversations around phonemes you see your students confusing in their speech, reading, and spelling.
- Identify the phoneme(s) your students are confusing on your sound wall.
- Using hand-held mirrors, discuss place and manner of articulation as you compare the phoneme(s) your students are confusing.
- Provide students with phonological awareness warm-up activities related to your target phoneme using your Sound Wall Solutions™ manual.

Common confusions to consider: voiced vs. unvoiced, phonemes similar in place and manner of articulation (located in the same column or row on your sound wall).
During phonics lessons
Many teachers revisit their sound walls during their phonics lessons to illustrate the connection between speech and print.
- Begin with a review of the phoneme(s) you will teach in your phonics lesson by revisiting the blue script in your Kid Lips™ Instructional Guide.
- Provide your students with a phonological awareness warm-up related to your phonics lesson by turning to the focus phoneme in your Sound Wall Solutions™ manual.
- Introduce the new phonics skill by revealing the target grapheme on your sound wall. Emphasize the connection between the phoneme and grapheme on the sound wall and continue your phonics lesson in your core program.
If implemented well, sound walls can be utilized throughout the day in your instructional routines to help students make the connection between speech and print. Frequent, distributed practice over time will enable your students to retrieve the information needed to read and spell accurately and automatically. Next time, we explore how to use your sound wall to build targeted phonemic awareness activities you can incorporate into your instructional practice.